Providing an example app that exerts the package is very common. A straightforward method is to create an Xcode project for the app inside an Example directory:
MyPackage
	Example
		Example.xcodeproj
	Sources
		…
Then, open Example.xcodeproj and add MyPackage using File > Add Packages…. Your package will then be listed as a dependency of the Example App.
Now you are faced with a problem: when developing the package, you would like to edit the code of both the example app and the package, but the package’s code is read-only.
There is however a trick: you can drag your Package in the Example App’s project again. This way, the package is both a local package and a “published” package. You can edit its code and push its code directly to the remote repository (on github).
Translation of storyboards
You will easily find documentation about translating resources. First, a default localization must be declared in the package’s manifest:
let package = Package(
 name: "Astral",
 defaultLocalization: "en",
You will have to create subfolders for translations manually, as the current version Xcode (13.2) does not provide an option to create localizations, as it does for targets:
Here again, Xcode has a tool to extract strings from the Base storyboard to the localized .strings file, like these:
// MyPackage.strings

/* Class = "UITableViewController"; title = "Readers discovery"; ObjectID = "g2Y-ee-6gs"; */
"g2Y-ee-6gs.title" = "Readers discovery";

/* Class = "UILabel"; text = "Disconnect this Reader"; ObjectID = "jdX-zC-qRq"; */
"jdX-zC-qRq.text" = "Disconnect this Reader";
but this tool does not work for packages!
A solution is to create a brand new project, for instance of type “Framework” and drag MyPackage.storyboard to it. Then you will find the option to create its localizations, and the menu items Product > Export/Import Localization if needed.
I have sent a feedback to Apple, and hopefully the options will be added, but we have a workaround in the meantime.
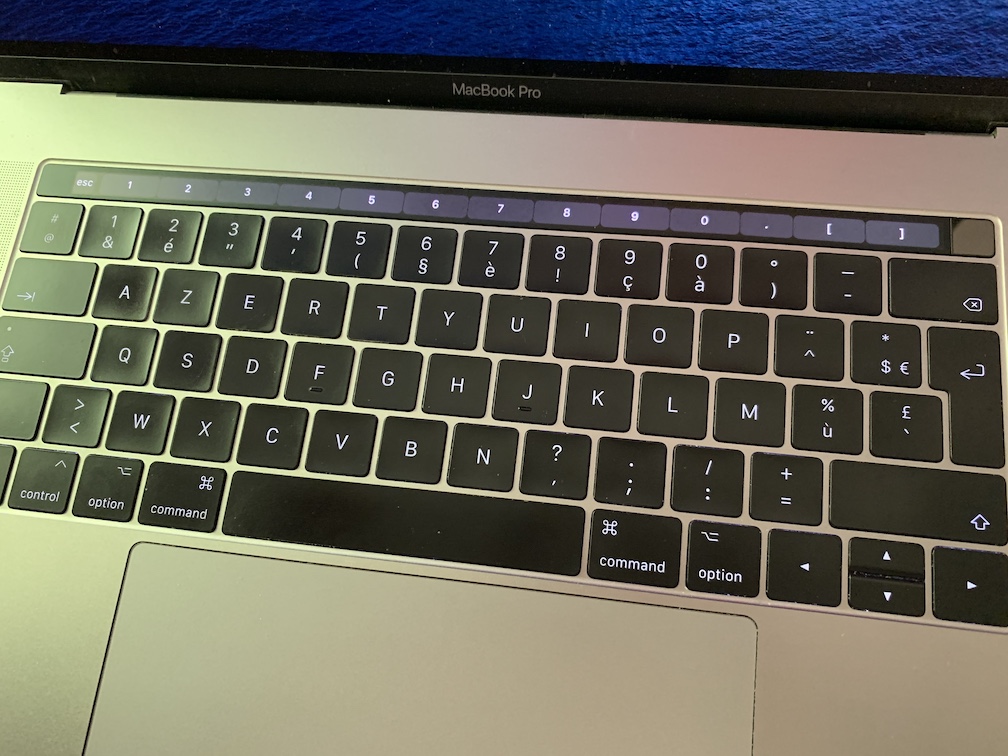
I know a number of fellow French programmers who always order their new Macs with an English keyboard, despite it being unadapted to the French language. French AZERTY keyboards are inconvenient for programming:
one must press the Shift key to type digits
typing some characters is awkward, e.g. pressing Option-Shift-( to type a [.
By default, text editors have keyboard shortcuts that can not even be typed. I have customized Xcode’s shortcuts for this reason.
I thought I could use the TouchBar to provide me extra keys!
How to customize the TouchBar
You basically have two choices:
BetterTouchTool is the most obvious option. I haven’t actually tried it, but it’s cheap (about 10 €) and there’s a 45-day trial.
MTMR is free and open-source. I chose it because I wanted to study how it worked under the cover. The app is not notarized for Catalina and still needs refinements, but it works.
I actually had to study the source code to write the Preset. The documentation is unclear, but there is actually a problem with the manner to simulate key presses on macOS, since you have to provide a “keycode”:
You may find a list of keycodes here, or in Events.h of the HIToolbox framework. These codes are given for an American keyboard. For instance, it means that using the keycode 0x00 will type an ‘A’ on an American keyboard but a ‘Q’ on a French keyboard, because keycodes map to locations of keys, not characters.
The second problem is that MTMR currently does not offer a mean to provide key-modifiers along with the keycode, so I cannot simulate directly typing a Option-Shift-( to type a [.
I don’t know whether I am gonna keep this configuration but I should try it a couple of weeks to see if I get used to it.
I might also change my layout. Pressing Shift to type digits is not too much of an issue and I could propose other characters, or Alfred actions instead.
A surprising crash was reported in our app. Some users would write a number in a text field, for instance "7". We expected the field to be saved as a string in the database, and read back as a string, but this is not what was happening.
I wrote a unit test to reproduce the bug. The Product record is saved to the database and read back:
    func testStoresQuantityUnitAsString() {
        modelDatabase.dbQueue.inDatabase { (db) in
            let product = PFProduct()
            product.uuid = "TEST"
            product.quantityUnit = "7" // This is a string
            try! product.insert(in: db)

            let reloaded = PFProduct.load(withPrimaryKey: product.uuid, from: db)
            XCTAssertEqual(reloaded?.quantityUnit, "7")
        }
    }
XCTAssertEqual failed: throwing "-[__NSCFNumber length]: unrecognized selector sent to instance
Our bug was reproduced: a string was written in the quantityUnit field as a string, but we got a NSNumber when it was read back from the database.
I ask Gwendal for help
I am very lucky: since my employer incwo shares its premises with Pierlis, I only had to walk 10 meters to talk to Gwendal Roué, who is the author of GRDB and knows a thing or two about databases and SQLite in particular.
What’s reassuring is that, in the beginning, Gwendal was perplex as well. The database migration did create the column as a STRING, and we could verify that by opening the database in DBBrowser For SQLite. And then, he had an idea. He opened a Terminal window and launched sqlite3:
> sqlite3
SQLite version 3.28.0 2019-04-15 14:49:49
Enter ".help" for usage hints.
Connected to a transient in-memory database.
Use ".open FILENAME" to reopen on a persistent database.
With an in-memory database, it is now possible to execute SQL queries. Gwendal began by creating a table with a STRING column:
sqlite> CREATE TABLE t1(a STRING);
Then he inserted three rows with different types (a string which contains digits, a alphabetic string, and a number):
sqlite> INSERT INTO t1 (a) VALUES ('7');
sqlite> INSERT INTO t1 (a) VALUES ('TOTO');
sqlite> INSERT INTO t1 (a) VALUES (12);
The typeof() operator gives the actual type of storage of a field:
sqlite> SELECT typeof(a) FROM t1;
integer
text
integer
What? '7' —a string — was stored as an integer!
This actually confirms Gwendal’s intuition. In this page of SQLite’s documentation, you can see that STRING is not a storage class of SQLite. TEXT is. But as Gwendal tried to explain to me, SQLite tries to be compatible with SQL queries of other databases and will not complain if we use column types it does not know; instead it will do a guess, based on the actual type of the data. This is called “Type Affinity” in the document.
The fix
So we knew the problem: we ought not use STRING as a type for a column in SQLite. And the solution: use TEXT instead. But how can we fix the code? In SQLite, the type of a column can not be changed after its creation. This is a very usual problem and I know the steps:
disable foreign keys checks during the migration
create a products_temp table with the exact same fields as the products table, but the type of the quantityUnit column declared as TEXT instead of STRING.
copy data from the products table to the products_temp table.
delete the products table
rename products_temp to products
A question still remained. Will copy the data work? That is, we knew that some columns were stored as integer. Will copying them to a TEXT column convert them seamlessly to strings ?
sqlite> CREATE TABLE t2 (a TEXT);
sqlite> INSERT INTO t2 SELECT a FROM t1;
sqlite> SELECT a, typeof(a) FROM t2;
7|text
TOTO|text
12|text
Yes it will!
Conclusion
In this post my interest was more showing how Gwendal typed SQL queries to debug than the actual bug.
Gwendal told me that GRDB prevents this types of bugs because the usual way to create a table is using higher level functions, not using SQL. However our code base is still mainly written in Objective-C and we don’t use GRDB directly, but through its Objective-C binding. I look forward to the day that our whole database layer is re-written in Swift.
I had already delivered a SDK, written in Objective-C, as a Static library and its accompanying header files. After a few months, though, the developers who use the SDK came with the reasonable request to be able to integrate it in their apps using these two popular dependency managers.
Enabling bitcode
The developers also requested that Bitcode was enabled. Apple still does not make it mandatory to submit to the App store, but both Cocoapods and Carthage set the “Bitcode enabled” build flag to YES, so my static lib had to include the Bitcode sections.
Build a universal library
If you’ve ever built a “universal” static lib yourself — one that works both on iOS and iOS Simulator targets — then you know that building one consists in:
build the iOS target
build the iOS Simulator target
combine them in a single library using the lipo command.
Generate the Bitcode
This article explains that when building the two targets, the OTHER_CFLAGS="-fembed-bitcode" must be passed to xcodebuild. And that’s all that is needed.
Surprisingly to me, Bitcode is not an other architecture, but is a section for each architecture instead, marked as __LLVM, __bitcode in the .a file.
To check that the generation was correct, I searched these sections using MachOView, but you may also use otool and grep.
Carthage
To my surprise, this was the longest part. This is actually not difficult, but there is a catch.
In Xcode, create a new project, of type “Cocoa Touch Framework”. This is a Dynamic framework.
Put the .a and the .h files in it.
Edit the Scheme, and set it as Shared. Otherwise, Carthage won’t be able to build it.
Now the catch: when building the final dynamic framework, Carthage first checks out the framework to the Carthage/Checkouts folder. The important information here is that it does a git checkout; not a copy!
This is implicit but it was not obvious to me. I wondered why my Objective-C symbols did not show in the final framework, while the reason was simply that my changes to the local directory were not taken into account.
One last point: in the Cartfile, it is possible to provide the name of a git branch instead of a version:
git "path/to/the/local/git/directory" "master"
This is handy since you don’t need to create a new git tag for each change for it to be taken into account. You still need to commit though.
Finally, in my own repository, I added a Carthage directory which contains the Xcode project for the Dynamic framework. I was not able to add the Framework target to the other Xcode project, because of name conflicts.
Cocoapods
Cocoapods deserves its reputation of being complicated and invasive. After reading its documentation again and again, I did what I should have done earlier: find a similar Pod (distributed as a compiled .a) and do the same.
My client does not want anyone to download its SDK, so it is stored in a private github repo, only accessible to a chosen few.
To use the private podspecs, clients only need to write in their Podfile:
source 'https://github.com/MyClient/Podspecs.git'
The private Podspecs repository itself must be organised as follows:
/Specs
  /MySDK
    /1.3.0
      MySDK.podspec
Finishing words
Nothing was particularly difficult, but it took me a lot of time, because of the lack of information, and sometimes contradictions, particularly for Cocoapods (lot of steps described in the doc are not really needed). Carthage proved to be simple enough but has its own logic.
Someone created a fork, which essentially adds a script to build LuaJIT for the several architectures needed by iOS, then combines them using lipo: github.com/cailei/luajit.
I updated the script by taking the latest SDK versions and removing the reference to gcc inside the Xcode bundle:
#/bin/sh

# Check if the binary exists.
# if [ -f "lib/libluajit.a" ]; then
#     exit 0
# fi

if [ ! -d lib/temp ]; then
    mkdir -p lib/temp
fi

IXCODE=`xcode-select -print-path`

# Build for MacOS (x86_64)
echo "Building for macOS x86_84"
ISDK=$IXCODE/Platforms/MacOSX.platform/Developer
ISDKVER=MacOSX10.12.sdk
ISDKP=$ISDK/usr/bin/
ISDKF="-arch x86_64 -isysroot $ISDK/SDKs/$ISDKVER"
make clean
make TARGET_FLAGS="-arch x86_64"
mv src/libluajit.a lib/temp/libluajit-macos-x86_64.a

# Build for iOS device (armv7)
echo "Building for iOS armv7"
ISDK=$IXCODE/Platforms/iPhoneOS.platform/Developer
ISDKVER=iPhoneOS10.2.sdk
ISDKP=/usr/bin/
ISDKF="-arch armv7 -isysroot $ISDK/SDKs/$ISDKVER"
make clean
make HOST_CC="gcc -m32 -arch i386" CROSS=$ISDKP TARGET_FLAGS="$ISDKF" \
     TARGET_SYS=iOS
mv src/libluajit.a lib/temp/libluajit-ios-armv7.a

# Build for iOS device (armv7s)
echo "Building for iOS armv7s"
ISDKF="-arch armv7s -isysroot $ISDK/SDKs/$ISDKVER"
make clean
make HOST_CC="gcc -m32 -arch i386" CROSS=$ISDKP TARGET_FLAGS="$ISDKF" \
     TARGET_SYS=iOS
mv src/libluajit.a lib/temp/libluajit-ios-armv7s.a

# Build for iOS simulator
echo "Building for iOS Simulator"
ISDK=$IXCODE/Platforms/iPhoneSimulator.platform/Developer
ISDKVER=iPhoneSimulator10.2.sdk
ISDKP=/usr/bin/
ISDKF="-arch i386 -isysroot $ISDK/SDKs/$ISDKVER"
make clean
make HOST_CFLAGS="-arch i386" HOST_LDFLAGS="-arch i386" TARGET_SYS=iOS TARGET=x86 CROSS=$ISDKP TARGET_FLAGS="$ISDKF" \
     TARGET_SYS=iOS
mv src/libluajit.a lib/temp/libluajit-simulator.a

# Combine all archives to one.
libtool -o lib/libluajit.a lib/temp/*.a 2> /dev/null
rm -rf lib/temp
make clean
The script works seamlessly with LuaJIT 2.0.4.
Unfortunately, LuaJIT does not support the arm64 architecture yet.
The most significant limitation of SwiftRay is its slowness. A few weeks ago, I had already sped it up by exploiting more than one core. Since my Mac has 4 cores, it ran about 3,5 times faster.
The algorithm
The first version of SwiftRay was built after a book, which I bought the second volume, Ray Tracing: the Next Week. It exposes an algorithm, the Bounding Volume Hierarchy, which consists in sorting primitives — only spheres at the moment — in a binary tree. The principle is that instead of testing if a ray hits any object in the scene, we first test if it hits the volume of the whole hierarchy at all. If it does, then we test for the two halves, then their two halves, and so on, until we get to a leaf of the tree — that is a primitive.
The speed-up comes from the facts that:
a lot of rays won’t hit any object at all
we can get quickly to the object that does receive the ray
A bvh_node inherits the hitable “protocol” (thought there’s no such thing in C++). Its constructor method takes a list of hitables, which are actually the primitives in the scene.
I will spare you the implementation of the constructor, which actually produces the binary tree. When the tree has been built, each bvh_node has a left hitable and a right hitable as children, which either have two children as well, or point on the same hitable.
The following method determines whether the volume (bounding box) of the BVH node is hit. If it is, it calls itself recursively for its left and right children to see which one is closer, or it hit at all:
Let us take a look at my implementation. It is nearly a straight port, with the exception that my Swift code makes use of optionals instead of booleans to tell if there is a hit:
struct BoundingNode: Hitable {
    let left: Hitable // A Node has necessary two branches, but they can point on the same Hitable if needed
    let right: Hitable
    let boundingBox: BoundingBox

 // I spare you the init method which builds the tree

    func hit(ray: Ray, distMin: Float, distMax: Float) -> HitIntersection? {
        guard boundingBox.isHitBy(ray: ray, distMin: distMin, distMax: distMax) else {
            return nil
        }

        if let leftIntersec = left.hit(ray: ray, distMin: distMin, distMax: distMax) {
            if let rightIntersec = right.hit(ray: ray, distMin: distMin, distMax: distMax) {
                return leftIntersec.distance < rightIntersec.distance ? leftIntersec : rightIntersec
            } else {
                return leftIntersec
            }
        } else {
            if let rightIntersec = right.hit(ray: ray, distMin: distMin, distMax: distMax) {
                return rightIntersec
            } else {
                return nil
            }
        }
    }

}
When the optimization slows down computations
I had a problem: images still rendered, but computations were actually much slower ! By a factor of 2 to 40 depending on the scene.
Since I’m only human, my premise was that my code had an error. And yes it had: the code to determine if a Bounding Box was hit was wrong. This would make the process slower. But once fixed, it still was very slow.
My second thought was that maybe building the tree was buggy. This would also slow down by big amounts the code since it would not tell quickly if a volume was hit. It was very hard to see in the debugger, so I eventually introduced Rectangle primitives, so I could draw Bounding Boxes. And to my surprise, my code was correct!
That was the time I thought that profiling my code could provide me an insight, so I fired up Instruments > Time Profiler, to state that the code spent a lot of time into
protocol witness for Hitable.hit() in conformance BoundingNode
Searching the web, I learned that “protocol witness” is a virtualization table to solve the conformance to protocol. That was odd to me. BoundingNode being a struct, I expected to have a straight call to the hit() method, with no indirection.
I watched a video of the WWDC ’16 which proved me I was wrong. Yes, Swift does Dynamic Dispatch on structs when they conform to a protocol.
Once, I learned a little Haskell
A few months ago, I took some time off to learn the basics of Haskell. A lot of exercises in the books have to do with… Trees.
A binary tree in Haskell may be declared as:
data Tree = Leaf a | Branch Tree Tree
In English: A Tree is either a Leaf (with a as data) or a Node with two child trees.
I have watched a presentation which was boring for the most part, but had an interesting point: Haskell’s Algebraic Data types can be implemented as Enums in Swift:
indirect enum Tree {
    case leaf(Hitable, BoundingBox)
    case branch(Tree, Tree, BoundingBox)
}
The indirect keyword is a recent addition to Swift (version 3?) and informs the compiler that the recursive definition of the enum is voluntary.
In case you have not yet understood: I am going to replace the struct calling its own method with an enum, to get rid of Dynamic Dispatch.
The new code
struct BoundingVolumeHierarchy: Hitable {

    indirect enum Tree {
        case leaf(Hitable, BoundingBox)
        case branch(Tree, Tree, BoundingBox)
    }

    var root: Tree? = nil

    private func boxOf(tree: Tree) -> BoundingBox {
        let box: BoundingBox
        switch tree {
        case .leaf(_, let leafBox):
            box = leafBox
        case .branch(_, _, let branchBox):
            box = branchBox
        }

        return box
    }


    private func hit(tree: Tree, ray: Ray, distMin: Float, distMax: Float) -> HitIntersection? {
        switch tree {
        case .leaf(let hitable, _):
            return hitable.hit(ray: ray, distMin: distMin, distMax: distMax)
        case .branch(let left, let right, let bbox):
            let isHit = bbox.isHitBy(ray: ray, distMin: distMin, distMax: distMax)
            if isHit == false {
                return nil
            } else {
                if let leftIntersec = hit(tree: left, ray: ray, distMin: distMin, distMax: distMax) {
                    if let rightIntersec = hit(tree: right, ray: ray, distMin: distMin, distMax: distMax) {
                        return leftIntersec.distance < rightIntersec.distance ? leftIntersec : rightIntersec
                    } else {
                        return leftIntersec
                    }
                } else {
                    return hit(tree: right, ray: ray, distMin: distMin, distMax: distMax)
                }
            }
        }
    }

    func hit(ray: Ray, distMin: Float, distMax: Float) -> HitIntersection? {
        return hit(tree: self.root!, ray: ray, distMin: distMin, distMax: distMax)
    }

}
I don’t find the new implementation very elegant, since I need the box() method to extract the Bounding Box from the Tree, but I don’t know Swift enough yet to envision a better solution.
Results
I won’t make you wait: yes, the implementation is efficient now. I’m very happy for the improvement, since I was hopping for a speed improvement of 2 times.
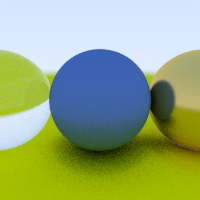
Simple Scene
200 x 200 px @ 100 rays/px
without BVH: 10.76 s
with BVH: 11.01 s
speed-up: 0.977 times
In this Scene, there is a slight slow down, which is not surprising since there are only 4 spheres, and hierarchizing them does not provide any benefit.
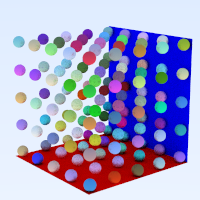
Sphere Array Scene
200 x 200 px @ 100 rays/px
without BVH: 42.25 s
with BVH: 11.42 s
speed-up: 3.7 times
I designed this scene knowing that the algorithm would be efficient. Removing the rectangles makes it more efficient.
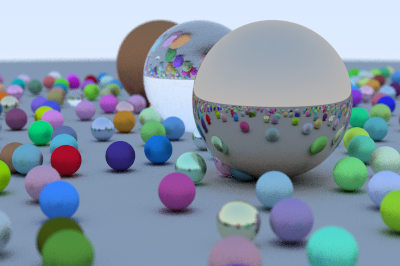
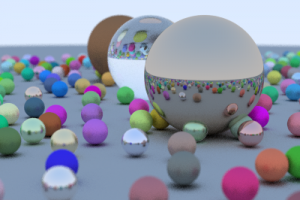
Big and Small Spheres
400 x 266 px @ 100 rays/px
without BVH: 523 s
with BVH: 48s
speed-up: 10.9 times
The algorithm becomes really efficient when there are a lot of objects, which only occupy small portions of the space. The speed up is impressive in this reference scene.
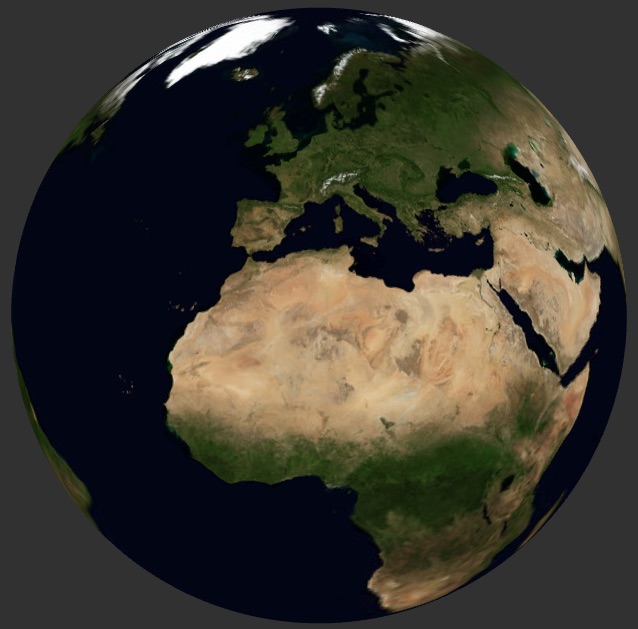
In the last two years and half, I have been working for Meteo Consult on an internal application running on a Mac, to create 3D meteorological maps, broadcast on the TV channel La Chaîne Météo.
A sphere, colour-mapped with NASA’s Blue Marble Next Generation. The Blue Marble measures 86400 by 43200 pixels, which is too big for most hardware, and too long to load anyway.
A detailed texture is needed
One major problem we have since the beginning is how to cover the Earth with a texture, since the texture has to be huge to be detailed enough. Currently we are stuck with a smaller texture, which presents two drawbacks:
The Earth is hardly detailed enough, so the minimum altitude of the camera is limited. For example, La Martinique or La Guadeloupe are only small blurry dots. We currently rely on 2D maps instead.
Even with its low resolution, the texture takes a lot of time to load on the GPU; about 3 s on my MacBook Pro 2013.
Hopefully, the application runs on a Mac Pro, which has a lot of GPU RAM; but even if we could load a big texture, GPU generally don’t handle textures larger than 16384 pixels, so we would be stuck anyway.
Tiles
Probably the solution was obvious to you: use tiles, Boy ! Of course, we thought of that since the beginning of the project, and I even tried to make something work, but to no avail. The major difficulty was to determine which tiles were visible. It’s rather easy on a flat 2D surface, but I could not find a reliable solution for the round 3D surface of the Earth.
Megatexture
Megatexture, also known as “Sparse Virtual Texture”, is a technique to compose a big virtual texture using tiles. The term was coined by John Carmack, who imagined this technique. I’ll stick with “Megatexture” since it sounds much cooler than “Virtual Texture”.
The virtual texture is made of tiles, which number varies with the Mipmap level.
Determining visible tiles
The great insight is how visible tiles are determined: the scene is rendered to an offscreen buffer, with a special fragment shader. In my case, the Megatexture is at most 256 by 256 tiles, and has a maximum of 8 mipmap levels, so the shader stores the tile’s x in the red component, the tile’s y in the green component, the mipmap level in the blue component, and the Texture ID in the alpha component. The scene is rendered to a RGBA8 offscreen buffer.
Texture ID
There may be several megatextures in a same scene. The texture ID permits to differentiate them in the Cache and in the Indirection Table later. Since objects which are not megatextured won’t be processed in the shader, you need to reserve a special Texture ID to mean “No texture”. It must corresponds to the buffer’s clear color, therefore I advise you choose the value 0x00, so it corresponds to a transparent color (since the texture Id is saved to the alpha channel).
Tiles determination shader
I’m sorry but I can’t provide my own code, so I’ll give you Sean Barrett’s instead, who was a pioneer in the technique, and made his code public:
    const float readback_reduction_shift = 2.0;
    const float vt_dimension_pages = 128.0;
    const float vt_dimension = 32768.0;
    uniform float mip_bias;
    // analytically calculates the mipmap level similar to what OpenGL does
    float mipmapLevel(vec2 uv, float textureSize)  {
        vec2 dx = dFdx(uv * textureSize);
        vec2 dy = dFdy(uv * textureSize);
        float d = max(dot(dx, dx), dot(dy, dy));
        return 0.5 * log2(d)   // explanation: 0.5*log(x) = log(sqrt(x)) + mip_bias - readback_reduction_shift;
    }
This first part determines the mipmap level. The formula is copied straight from OpenGL’s implementation, so everyone uses the same.
vt_dimensions_pages is the size of a Tile (what Barrett and a number of people call a “Page”, but which I find inappropriate).
vt_dimension is the size the megatexture at the most detailed level (mipmap 0).
you’ll see below that the CPU is going to read the pixels of the offscreen buffer. To save a lot of processing power, the scene is not rendered at full size. readback_reduction_shift is a power of two; since it equals to 2 here, the offscreen buffer is a quarter of the width and height of the final rendering. I personally set this value to 4, and set the width and height of the buffer to 1/16th of the size of my view.
I’m not sure what mip_bias is. I believe this is a way to make the shader less agressive in its changes of mipmap levels, at the cost of the texture being a little blurry at times. (I don’t use it my own implementation).
The second part determines the Tile’s x and y and renders them in the color buffer:
    void main() {
        // the tile x/y coordinates depend directly on the virtual texture coords
        gl_FragColor.rg = floor(gl_TexCoord[0].xy * vt_dimension_pages) / 255.0;
        gl_FragColor.b = mipmapLevel(gl_TexCoord[0].xy, vt_dimension) / 255.0;
        gl_FragColor.a = 1.0; // BGRA: mip, x, y, 255
    }
Note that there is a mistake here: the mipmap level must be floored! Otherwise there will be a discrepancy between the level determined here, and the one determined in the Texturing shader.
Result
A small image:
I changed the way colours are rendered so the image is visible, but the size is real. If the OpenGL view renders at 800 x 600, then the offset buffer is rendered at 1/16th of that, that is 50 x 37.
Loading tiles in the Cache
Reading back the offscreen buffer
I use glReadPixels to get the pixels. Every pixel corresponds to what I call a “Tile Id”: texture Id, x, y, mipmap level. Pixels with the “None” texture ID are discarded immediately. Others are converted to TileId objects, which are added to a NSMutableSet, in order to remove duplicates: since a same tile shows at several places, its TileId will appear several times.
It is not necessary to read the buffer, and therefore determine visible tiles, at every draw cycle. I do it only once every 4 frames (at 60fps = every 15th of second).
Determine the tiles to load
Now we have a list of visible tiles, we can compare them to the ones already in the Cache. The difference is the tiles to load.
In my implementation, tiles are loaded as background tasks, but textures are loaded in GPU memory on the main thread, because we have to with OpenGL. This textures obviously don’t have mip maps, but do use interpolation.
While the tile is loading, you will like to replace it with a “parent” tile— one with lower details — already in the cache. This is not too difficult, since the replacement only consists in a substitution in the Table of Indirection. Since the parent might not be in the Cache either, you should look for the grand-parent or grand-grand-parent, etc. I add the “base tile” (the lowest resolution one) to the set of visible tiles, so I’m always sure that at least the Base tile is in the Cache.
The Cache
The Cache itself is simply a texture (not mipmapped, but interpolated), which forms a grid of tiles. You need somewhere a table of correspondance between a position in the Cache and a TileId. I use a dictionary, indexed by the TileId. Use glTexSubImage2D() to replace only the part of the texture which contains the new tile.
When the Cache is full, some tiles must be dropped. People and I use a simple Least Recently Used mechanism to determine which ones. It’s simple, it works. I tried other heuristics, based on the mipmap level, to drop the least detailed tiles in last resort, but it did not work great, leading to load the most detailed tiles too frequently.
Dropping a Tile consists in marking its position as free in the table of correspondance. Since it does not perform OpenGL calls, it can be done at any time.
The Cache does not have to be huge: 16 x 16 tiles works. In my experience 8 x 8 tiles is not big enough on a Retina display: the program loads tiles and drops them continually. Make the Cache bigger if you want to remove some burden on the CPU, or have several Megatextures.
A 256 x 256 tile takes 250 KB of memory, so a 16 x 16 tiles cache takes 64 MB. That is very reasonable.
Table of Indirection
The Texturing Shader needs to know what are the coordinates of a Tile in the Cache texture. For that purpose, it is provided a Table of Indirection, which is a mip mapped texture.
A pixel of the texture contains the following information:
x position in the cache (stored in .r)
y position (in .g)
mipmap level (in .b).
For a particular mipmap level, this table has one pixel per tile. For instance, say that my megatexture measures 256 x 256 tiles at mipmap 0, then the texture measures 256 x 256 pixels at mipmap 0. There are only 128 x 128 tiles at mipmap 1, and hence the table measures 128 x 128 pixels at mipmap 1. There is a straight correspondance, so the Texturing Shader determines the tiles x and y according to the texture coordinate, and does a simple look up. (In other words, there is a table of indirection for every mipmap level. All these tables are combined in a single mipmapped texture).
You might wonder why the mipmap level is stored in the table, since it can be determined by the shader. Actually, this is what allows to substitute a parent tile; in that case, the pixel contains the x, y, and mipmap of the parent — not the child. The mipmap level of the parent tile is needed to determine correctly the position within the parent tile.
Older versions of OpenGL (like the one I’m constrained to use, because of Apple), did not allow to sample the texture for a particular mip map level. However, texture2D() may take a third parameter, which is a value added to the implicit mipmap level (the one computed by OpenGL). I don’t know why 0.5 is substracted, but it works better this way.
I must say that I had a lot of problems with this principle because it assumes that:
Tiles are square
The megatexture is square
Since I had to cover the Earth, my megatexture was not square, but had a 2:1 ratio instead. And my tiles were 512 x 256 pixels. If this is not the case, you will run into troubles, because the computation of the mipmap level is right vertically, but not horizontally, and you will have visual artifacts, since the wrong mipmap level is sampled from the indirection texture.So, don’t do that: make your tiles square and stretch your megatexture if needed. It will save you a lot of pain.
(With a more recent version of GLSL, you might use texture2DLod(), and compute the mipmap level like in the Determination Shader, and not have this problem).
The MegaTexture is precise enough so the Richat Structure (“The Eye of Sahara”) can be seen.
Generating Tiles
We’re not done yet! Remember that the megatexture is a huge image that must be cut into tiles. I personally wrote a Python program that uses Image Magick to cut tiles and resize them. I won’t go into details here, but you must know that Image Magick is slow, and not very user friendly (and that by default, rescaling is proportional). You may do it otherwise, maybe using a Photoshop script or whatever.
Seams
There is one final problem with the principle of the megatexture itself. Because tiles are all stored in the Cache texture in a random order, a tile is unrelated with its neighbours. This causes visual problems because of the linear interpolation of tiles, which will cause half a pixel of neighbour textures to show:
Borders of tiles are visible
The solution is well known: leave a margin of 1 pixel on each side, and sample at this size. Hence the actual usable size is 254 x 254 pixels on my 256 x 256 tiles.
Further reading
I could not have made my Megatexture work without the following resources:
http://www.noxa.org/blog/2009/11/29/megatextures-in-webgl-2/
This was my main source of inspiration, because it is very synthetic, covers most issues and guides toward a practical implementation. I don’t use his principle for the Indirection Tables though, which I find awkward. Maybe he could not do otherwise in WebGL.
The example of Sean Barrett
There is a video, but I found it rather difficult to follow. It does not explain the basic technique well, but it might be interesting if you want to handle tri-linear filtering (which I don’t). You might also like to take a look at the source code, since most shaders written by other folks are based on it.
Thesis by Albert Julian Mayer
This is really interesting as it sums up a lot of the techniques that are known for virtual texturing. You should definitely take a look if there are details you did not understand in my post, or if you want to push the technique further.
I decided to take a month off from client projets, so I could work on subjects which I don’t usually have the time to work on.
Since I began learning Haskell lately, I knew that I had to code a real project. Actually, I think it’s the only way to study programming seriously: stick to a problem and find ways to attack it. A Raytracer looked like a reasonable idea for a project, since Raytracers use recursivity, which is the specialty of functional languages like Haskell.
Anyway, to sum up: I began with Haskell, and I ended with Swift. I met some difficulties regarding pseudo-random numbers in Haskell, I was tired and I was not sure about what was wrong (this was my first raytracer). I have not really given up, just passed on to keep my motivation.
The original source code was written in C++. I was asked if porting it to Swift had been hard: Not really. Sometimes it was difficult to follow the C++ code, because of the way it is written, but Swift is way more elegant than C++, and has all required features — in particular operators overloading, which are more than useful when working with vectors.
The second question was how it performs, compared to C++. I don’t know, since I have not measured. I don’t care really, and that was not an aim for my experiment. All I can say is that it’s about the speed I expected: very slow. Shirley uses a “Pathtracer” algorithm. Wikipedia says that this is a characteristic of these raytracers. It already takes hours to render with 100 rays by pixel (112 minutes on my Mac for the very small and simple image above), and the image is still very noisy. At least 500 rays would be needed!
Currently the program uses a single thread. The obvious next step is therefore to parallelize the work so I can use all 4 cores of my Mac. Since I mostly used Structs (≃ immutable objects), it should be easy. I let you know when I find the time…
I’ve been reading Yegor Bugayenko’s blog (yegor256.com) for a year or so. At the time I was struggling with Core Data, and I could not really explain why until I stumbled upon one of its blog posts entitled along the lines of “Why ORMs are evil”. This post made explicit in my mind what I felt was wrong with ORMs but I could not articulate, and also provided an alternative.
At the time, I was studying a little of Functional Programming and was begining to think that what was wrong might be Object-Oriented Programming in the first place. And then Yegor’s blog opened up my eyes, and I discovered I have been doing it wrong for ages. Not that my code was terrible; it was actually very close to the standards of our industry — which means not so good.
His blog confirmed I was on the right direction on some things: for example, my latest code was written so my objects were immutable, which proved to make them easier to design and test, without any inconvenient in practice. It also made me reconsider my use of abstract classes, by using small protocols (you would say “interfaces” in Java) instead.
A manifesto for Object Thinking
The book is a kind of collection of the most emblematic blog posts he had written. However, it is certainly not copy-and-paste. The book is well organised into four parts — Birth, Education, Employment, Retirement — carefully chosen to emphasize the anthropomorphic nature of Objects. The chapters and paragraphs themselves were rewritten to make the whole book consistent.
Yegor Bugayenko thinks our industry is all wrong with OOP. People on its blog frequently treat him of an «OOP extremist», which he would take as a compliment! As such, the book is very cleaving, with frequent words like “evil”, “all wrong”, “you must”, “I think”. It is very opiniated, which is its greatest quality, a book is meant to present things an other way; otherwise you would not learn anything.
What distingues its discourse from trolling is that each point is argumented. The author tries to convince with examples, how they are wrong and how they could be made better. Most examples are great, a few are awkward, but in all manners, they have the merit to make the reader think.
I would recommend the book to any seasoned OOP programmer, although it is not perfect. In its current state, it looks a lot like a manifesto: it strongly tells what the author is against, but not enough what can be done instead. I wished the author had better explained alternatives that he uses, like the Decorator design pattern, or how he passes dependencies around the application, for example when they are shared resources.
But maybe this first edition had to look like a manifesto, because this thinking is too radical. I wish the second edition will be less defensive and will provide more practical examples.
I have met two serious limitations when using Scene Kit’s -[SCNSceneRenderer hitTest:options:] method:
it is not sufficient to add a node to the scene for the hit test to find it. The scene must also have been rendered once.
the method takes a long time. In my example, about 20 ms in a very simple scene which only contains a couple of spheres. Unfortunately, I had to do it 2000 times, so it takes 40 s ! Totally unusable in my case.
The method seems to have been designed for user interaction, and is only suitable for that case.
(I finally solved the problem by coding my own hit testing, which was possible because I work with a simple sphere. It was not easy because of the lack of information on what the matrix of the SCNCamera really contains, but I eventually managed to reduce the time from 40 s to a couple of milliseconds).